Double Chocolate Silk Cream Pie

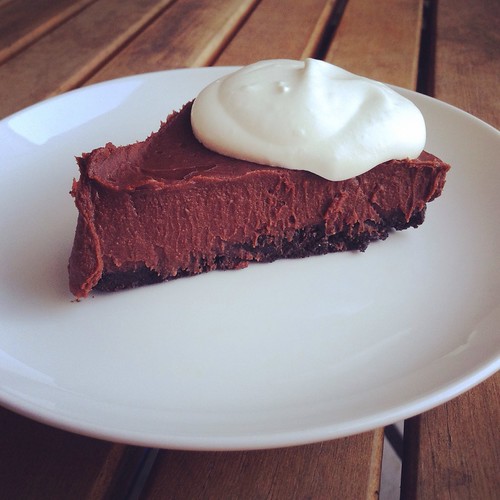
We all know I don't bake, but when I saw this recipe for Double Chocolate Silk Cream Pie I had to have it. An Oreo cookie crust and rich, chocolate filling sounded heavenly. And since there's no baking involved I figured it would be a piece of cake (or pie...ha!) to whip up one weekend.

Double chocolate silk pie

The only downside to this recipe is that the pie has to cool overnight. The original recipe says you can let it cool for 4-6 hours, but you really want this ice cold so overnight is probably best (at least in my opinion). The lingering smell of crushed Oreos and cooked chocolate drove us all crazy until we could finally enjoy a slice of this decadent pie.

A little goes a long way for this one, unless you have a serious sweet tooth. I served this with fresh whipped cream after Sunday dinner and we were all in love. Baby Girl especially loved this one, so I know I'll be making it again soon.

Double Chocolate Silk Cream Pie
As seen on Lauren's Latest

CRUST
20 Oreo cookies
6 tablespoons melted butter

FILLING
5 large egg yolks
1 1/2 cups heavy cream
3 tablespoons granulated sugar
1/8 teaspoon salt
1 1/2 teaspoons vanilla extract
10 oz. semi sweet chocolate chips

whipped cream, for serving

Place all the Oreo cookies (use the whole cookie) in a food processor. Pulse a few times until the cookies become crumbs. Mix the crumbs and melted butter together until moist. Press into the bottom and up the sides of a 9-inch pie plate or cake pan. Refrigerate while making the filling.

Separate the eggs, reserving the egg yolks in a bowl. Reserve or discard the egg whites. Lightly beat the yolks and set aside.

Place a medium-sized glass bowl over a pot with about an inch of simmering water (this is called a double boiler). Make sure the water does not touch the bottom of the bowl. Add the cream to the bowl and heat until you start to see bubbles forming. This will scald the cream. Stir in the sugar and salt, whisking until dissolved, about 2 minutes. Stream one tablespoon at a time of the hot cream into the egg yolks, whisking after each tablespoon is added. Do this 4 or 5 times. This is called tempering. Stir the tempered egg yolks back into the cream in the double boiler. Cook, whisking occasionally, until the eggs and cream start to thicken and coat the back of a spoon, about 8 minutes. The pie won't set if you don't thicken the cream and egg mixture long enough, so if you're unsure whether or not the mixture is thick enough, continue cooking for another 5 minutes.

Remove the cream and egg mixture from the heat and stir in the vanilla and chocolate chips. Whisk until the mixture is smooth and all the chocolate has melted. Pour the filling into the prepared pie shell and cool to room temperature.

Once the pie is cool, cover it with plastic wrap, pressing the plastic wrap directly onto the filling. Refrigerate the pie overnight. Cut into pieces and serve with whipped cream (recipe below).

Homemade whipped cream

1 cup heavy cream
2 tablespoons confectioners' (powdered) sugar

Place a metal, glass or ceramic bowl in the freezer for 15-30 minutes to chill. Once chilled, pour the cream into the bowl and add the sugar. Using an electric hand mixer or balloon whisk, beat the cream to the desired consistency. For soft peaks, the cream will be just thick enough to hold its shape. For stiffly beaten cream, the beaters or whisk wires will leave distinct traces on the cream and stand in firm peaks when the beaters are lifted.

MAKE AHEAD
The cream can be whipped up to 1 day ahead, covered tightly with plastic wrap, and refrigerated. If liquid separates from the cream, whip it again to incorporate the liquid.

Oklahoma Fried Onion Burgers

A few weekends ago we were all watching Cook's Country together (yes, my 5-year-old loves to watch cooking shows. It warms my heart). They were making something called Oklahoma Fried Onion Burgers and they looked mouthwateringly good.

Oklahoma fried onion burgers

For some reason that episode was on at least 3 or 4 more times within a two-week span and I finally told SP I had to make them. So, he picked up some ground beef at the store and I planned to make them one Saturday for dinner. Then we had a ridiculously huge lunch and couldn't stand the thought of eating again. The ground beef went into the freezer, where it was promptly forgotten. I finally remembered that I wanted to make the recipe and put the burgers on the menu two nights ago. They were so good I had to blog them immediately.

Oklahoma fried onion burgers

I thought these would be more complicated but it's actually a very easy recipe. All you need to do is plan ahead enough to let the onions sit in the colander. SP said they tasted like a McDonald's hamburger only a million times better. Baby Girl had the mini burger in the center of the picture above, sans onions because she isn't a fan. They even reheated well the next day.

Oklahoma Fried Onion Burgers
As seen on Cook's Country

1 large onion, peeled, halved and thinly sliced
salt and pepper
1 lb ground beef
1 tablespoon butter
1 tablespoon vegetable oil
4-8 slices American cheese
Mayo, mustard and pickles, for serving
4 hamburger buns, toasted

Combine the onion slices and 1 teaspoon of salt in a bowl and toss to combine. Transfer the onions to a colander and let sit for 30 minutes, tossing occasionally. Transfer the onions to a clean dish towel, gather the edges together and squeeze out as much liquid as you can from the onions. Do this over the sink or a large bowl since the onions will have quite a bit of liquid in them.

Divide the onions into 4 separate mounds on a rimmed baking sheet. Form the beef into 4 lightly packed balls. Place the beef balls on top of the onion mounds and flatten the beef firmly (use your palm) so the onion adheres to the beef. The patties should measure 4 inches in diameter. Season the beef generously with salt and pepper.

Melt the butter with the oil in a 12-inch skillet over medium heat. Using a large spatula, transfer the patties to the skillet, onion side down. Cook for 6-8 minutes, until the onions turn a deep golden brown and begin to crisp around the edges. Flip the burgers, then increase the heat to high and cook until well browned on the second side, about 2 minutes.

Add 1 or 2 slices of cheese to each burger and allow to melt. Add mayo, mustard and pickles to the top buns, then place each burger on a bottom buns. Serve immediately.

Chicken Tikka Masala

Can we talk about chicken thighs for a minute? I know I'm late to the party but holy moly are they good. Tender, juicy, flavorful, almost impossible to overcook. And cheap as all get-out. I had a serious craving for Chicken Tikka Masala recently and realized I'd never gotten around to trying my friend Melissa's version. This is now my go-to recipe.

Untitled

It's not that different from the previous version I used to make in terms of ingredients and flavor. The big differences are the use of chicken thighs and the cooking method. Melissa's recipe has you marinating the chicken and then baking it. My old version had you grilling the chicken. Baking is so much easier and clean up is a snap.

This was outstanding. Utterly fantastic. We all gobbled it up, using some delicious buttered naan to soak up the sauce.

Chicken Tikka Masala
As seen on Alosha's Kitchen

Marinade
1 cup plain yogurt
2 tablespoons lemon juice
1 tablespoon grated fresh ginger
2 teaspoons cumin
1 teaspoon ground cinnamon
1 teaspoon ground cayenne pepper
1 teaspoon salt
1 1/2 to 2 pounds boneless, skinless chicken thighs cut into large cubes

Sauce
1 tablespoon butter
2 cloves garlic, minced
1 jalapeno chile, minced
2 teaspoons ground coriander
1 teaspoon cumin
1 teaspoon sweet paprika
1 teaspoon garam masala
1 teaspoon salt
1 8 oz. can tomato sauce
1/2 cup half and half
1 cup water
1/2 cup fresh chopped cilantro

In a large food storage bag, combine yogurt, lemon juice, grated ginger, 2 teaspoons cumin, cinnamon, cayenne and 1 teaspoon salt. Add the chicken, toss to combine, seal the bag and refrigerate overnight.

Preheat the oven to 350. Spread the chicken out on a foil-lined baking sheet and cook for 25 minutes.

While the chicken is cooking, melt the butter in a 12-inch non-stick skillet over medium heat. Add the garlic and jalapeno and stir for 1 minute. Stir in the ground coriander, 1 teaspoon cumin, paprika, garam masala and 1 teaspoon salt. Add the tomato sauce, half and half and water and stir to combine. Reduce the heat to low and simmer gently until the sauce thickens, about 10 minutes.

Add the cooked chicken with all the accumulated juices (don't omit that!) to the sauce and let simmer for another 10 minutes. Garnish with chopped cilantro.

Serve over basmati or jasmine rice with naan for soaking up the sauce.

Fried Mozzarella Sticks

Baby Girl loves cheese sticks. She eats them as a snack almost every day after school. Or rather, she used to. One week I noticed the package in the fridge was still mostly full so I checked the expiration date. It was that weekend. Since the Super Bowl was coming up I figured I'd turn them into Fried Mozzarella Sticks and went searching for a recipe.

Untitled

The key to any mozzarella stick recipe is to freeze the cheese sticks before you bake or fry them. I'm not sure why the recipe I used doesn't say to do that but it's an absolute MUST. The cheese will melt if it's anywhere close to room temperature. Heck, even mine frozen started to melt and ooze as they fried. So do not, under any circumstances, forget that step.

These were delicious, full of melty, gooey cheese. I only made 8 since it was just the three of us. SP and I each had three and Baby Girl devoured two. I'll definitely be making these again the next time we have cheese sticks that need to be used up.

Fried Mozzarella Sticks
Modified from Add a Pinch

24 mozzarella sticks
1 cup buttermilk
1 egg
1 cup flour
3 cups panko
1 tablespoon Italian seasoning
vegetable oil
pizza or marinara sauce, for dipping

The day before you plan to make these, place however many cheese sticks you want to eat into the freeze. Freeze them overnight. Do not skip this step!

The next day, prepare three separate bowls for dredging your mozzarella sticks. Whisk the buttermilk and the egg in one bowl. Put the flour in the second bowl. In the third bowl, combine the panko and the Italian seasoning.

Dip each cheese stick into the buttermilk, then into the flour, then back into the buttermilk and finally into the panko. Set aside on a sheet pan until all the cheese sticks have been coated.

Pour about 1 inch of oil into a 12-inch non-stick skillet. Heat over medium heat until the oil starts to shimmer. Add a few cheese sticks at a time, being careful not to crowd the pan. Use tongs to remove them as they turn golden brown.

Place on a baking sheet lined with paper towels to drain. Serve warm with pizza or marinara sauce for dipping.

Creamy Tomato Basil Soup {Panera knockoff}

I'm not much of a soup person, but when Stephanie posted this recipe for Creamy Tomato Basil Soup {Panera knockoff} I was intrigued. I enjoy a good bowl of tomato soup with grilled cheese every now and then and the recipe seemed really simple and straightforward.

Untitled

As luck would have it, I had this on the menu the night the temps dipped to -30 degrees. As anyone in the northeast (heck, even the southeast has been seeing record low temps lately) can attest, it's C-O-L-D out there. This soup was hearty and delicious, perfect for a frigid night.

We only had one complaint and that was with the chunks of tomato. We wanted a rich, creamy soup and the chunks of tomato just didn't fit. I modified the recipe below to puree the diced tomatoes before adding them to the pot. You could also puree the soup once it's done cooking, using a blender or an immersion blender.

Creamy Tomato Basil Soup {Panera knockoff}
Slightly modified from Stephanie Cooks

1 14oz can diced tomatoes
1 28oz can crushed tomatoes
1 tablespoon crushed garlic
2 cups chicken broth
2 tablespoons sugar
5 tablespoons butter
1 cup heavy cream
15-20 basil leaves, minced

Place the diced tomatoes and their juice in a food processor and pulse to coarsely chop. Add the processed tomatoes, crushed tomatoes, garlic and chicken broth to a large Dutch oven. Bring to a boil. Boil for 10 minutes, stirring often.

Reduce the heat to low and stir in the sugar and butter. Continue stirring until the butter is completely melted and well combined.

Very slowly pour in the heavy cream while stirring constantly. You need to do this slowly to get the thick, creamy texture.

Stir in the basil and let simmer on low for about 20 minutes.

Easy Cheddar Cheese Sauce for Vegetables

We all love pierogies but it had been ages since I'd served them for dinner. I always serve them with bacon and caramelized onions, with a big dollop of sour cream. And I always serve steamed broccoli on the side. This time I wanted to do something a little different with the broccoli. Enter this Easy Cheddar Cheese Sauce for Vegetables.

Easy cheese sauce

This is the same sauce you'd make for mac and cheese. It's an easy sauce to make and was really good with the steamed broccoli. I thought the original recipe was a bit thick, so I've halved the butter and flour in the recipe below.

Easy Cheddar Cheese Sauce for Vegetables
As seen on Iowa Girl Eats

1 tablespoon butter
1 tablespoons flour
salt and pepper
1 cup milk
1-1/2 cups freshly shredded cheddar cheese

Melt butter in a saucepan over medium heat. Add flour and whisk for one minute.

Slowly whisk in milk then season with salt and pepper and switch to a wooden spoon. Stir and cook until thickened, about 4-5 minutes.

Turn off heat and add cheese. Stir until melted and smooth. Taste then season with additional salt and pepper if necessary. Serve immediately.

Cheater Korean Beef

This is one of those recipes that makes you wonder how something with so few ingredients (and pantry staples at that) can come together into something downright magical.

Cheater Korean beef

Amy's post about this Cheater Korean Beef recipe made it sound like one of the best things she's ever made so, of course, I was intrigued. I trust her judgement when it comes to food, and after a quick glance at the ingredient list I figured it would make a quick and easy weeknight meal.

What I wasn't expecting was for it to be so delicious I was fighting my 5-year-old for a second helping. And wishing my husband had other dinner plans that night. Seriously, this is so utterly amazing, there are no words. And it's ridiculously easy. So easy that said 5-year-old could probably cook it herself. You know, if she was allowed to use the stove.

Make this one soon. You won't be sorry.

Cheater Korean Beef
As seen on Very Culinary
Serves 2 (so double it or make a side dish if you want leftovers)

1 tablespoon sesame oil
1 pound lean ground beef
3 large cloves garlic, minced
1/4 cup brown sugar
1/3 cup low sodium soy sauce
1 teaspoon minced ginger
1/4 - 1 teaspoon chili garlic sauce (adjust to your spice preference)
salt and pepper
3 scallions, chopped
toasted sesame seeds

Heat the sesame oil in a large skillet over medium-high. Brown the beef until cooked through, about 3 minutes. Toss in the garlic and cook for another minute. Drain off all the fat*.

Stir in the brown sugar, soy sauce, ginger, and chili garlic sauce. Season with salt and pepper. Simmer for 1-2 more minutes to blend the flavors. Toss in the scallions.

Serve over hot rice and sprinkle with a few sesame seeds.

*Quick tip: An easy way to drain off the fat is to use paper towels. Turn off the heat, then move all the beef to one side of the skillet. Tilt the pan the other way so all the oil runs to the other side, away from the beef. Use balled up paper towels to soak up the excess oil. Leave a little oil in the pan (you want some moisture). Then simply throw the paper towels in the trash.

Florentine Lasagna Roll-ups

I haven't made a lasagna roll-up in years. I don't know why; they're so easy to make and more fun than regular lasagna because everyone gets their own roll or two. As soon as Kylee posted these Florentine Lasagna Roll-ups on her blog I knew I had to make them.

Chicken florentine lasagna roll ups

I prepped the roll-ups on a Sunday and popped it in the fridge for later in the week. The night we had them for dinner I just had to preheat the oven, make the salad while the roll-ups cooked and dinner was served. I love easy meals like that.

Prepped chicken florentine lasagna roll ups for dinner this week. I'm going to be so excited later this week when all I have to do is pop this in the oven to bake.

The only change I made was adding ricotta cheese to the filling. I had some to use up and ricotta is synonymous with lasagna, in my opinion. But feel free to leave it out since there's enough going on with that delectable Alfredo sauce.

Florentine Lasagna Roll-ups
Slightly modified from Kylee Cooks

Alfredo sauce:
1 stick butter
2 large garlic cloves, minced
2oz cream cheese
2 cups half and half
salt and pepper, to taste
1/2 teaspoon dried Italian seasoning
1/2 cup Parmesan cheese

12 lasagna noodles

Filling:
2 cups cooked and shredded chicken
1 1/2 cups baby spinach, chopped finely
1 cup ricotta cheese
1 teaspoon dried Italian seasoning
Salt and pepper, to taste
1 1/2 cups shredded mozzarella, or cheese of your choice

In a medium saucepan, melt the butter over medium heat. Add garlic and cook for about 1 minute. Add the cream cheese and whisk until smooth. Whisk in the half and half. Season with salt, pepper and Italian seasoning. Bring to a simmer (don’t boil!) and whisk frequently until the sauce thickens, about 15 minutes. Add the Parmesan and whisk until melted and blended. Set aside,

Cook the lasagna noodles according to package directions. Drain and rinse the noodles with cold water. Lay them out to dry on clean kitchen towels. This will make them easier to work with.

While the noodles are cooking, combine the chicken, spinach, ricotta, Italian seasoning, salt, pepper and 1 cup mozzarella cheese in a large bowl.

Spread about half a cup of the Alfredo sauce in a 9x13" baking dish. Working with one noodle at a time, place some filling onto each noodle, then roll it up. Place each roll seam side down into your baking dish. Top with the remaining Alfredo sauce and 1/2 cup mozzarella cheese. (If making in advance, stop here, cover the dish with foil or plastic wrap and refrigerate until ready to bake).

Bake at 350 degrees, for about 30 minutes until the casserole is heated through and cheese is bubbling.

Best of 2014: My Favorites

On Friday I brought you your 14 favorite recipes from 2014. Today I'm sharing my favorites from the year. Looking back through my posts, I realized I made quite a few awesome recipes. A few of these we eat time and time again while others are ones I need to remember to remake in 2015.

And this is where I struggle. There are only so many meals in a day. I want to remake all of these again and again, but there are literally hundreds of other recipes I want to try. Oh, the trial and tribulations of a food blogger.

Untitled

14. Breakfast Risotto - I love risotto and I love runny eggs. Put the two together and you've got one heck of a dish. The poached egg is key - you want that gooey yolk to mix with the risotto, almost like a sauce. So amazing.


13. Chicken Stew with Biscuits - This was a surprise winner for me. I'm not usually a fan of chicken pot pie, which is pretty much what this is. But there's just something wonderful and comforting about this dish. The biscuits on top just make it even better. I love that everyone gets their own biscuit.


12. Skillet Chicken Saltimbocca Spaghetti - I love one pot meals and this one is incredible. Salty, tangy and easy to make.


11. Collard Greens - I tried this recipe a year ago and it was a huge flop due to an excess of salt. I scaled way back on the salt this time and they were pure perfection, with just a hint of spicy goodness.


10. Oven Fried Chicken - To go with those delectable collard greens, we had this killer oven fried chicken. Not to toot my own horn, but this was some of the best fried chicken I've ever had. Moist and flavorful, with a crackly crust.

Untitled

9. "The Gobbler" - This sandwich is the perfect way to use up Thanksgiving leftovers. I can't wait for my mom to make another roast chicken with all the trimmings so I can make this again.

BBQ chicken sandwiches

8. Grilled BBQ Chicken Sandwiches with Brown Sugar Grilled Onions - These are some incredibly flavorful sandwiches. Don't be put off by the word "grilled" - you can make these year-round on an indoor grill pan or even just a regular skillet.

roasted salsa

7. Baja Fresh Grilled Salsa - We made this salsa for a get together with our friends and inhaled it. I love how easy it was to make, too.

Mozzarella stuffed meatballs

6. Mozzarella Stuffed Meatballs - These are my new favorite meatballs. So simple to make and I love the addition of the melty cheese inside. My new favorite way to eat them is just with some sauce and extra mozzarella, with some crusty buttered bread to mop it all up.

Hawaiian chicken and coconut rice

5. Grilled Hawaiian Chicken with Coconut Rice - I wish Baby Girl could eat coconut because this rice was outstanding. Definitely the highlight of the meal, although the chicken was also delicious.

Chicken piccata risotto

4. Chicken Piccata Risotto with Crispy Capers - Again with the salty, briny capers. What can I say, I have a thing for those little buds of goodness.

Untitled

3. Pasta with Chicken Meatballs - Another fantastic meatball recipe, only lighter because they're made with chicken instead of beef. These were like little pillows of softness that melted in our mouths.

Untitled

2. 3 Cheese Rosemary and Pepperoni Pizza - We make a lot of pizza and this one is, hands down, our all-time favorite. No contest. The fresh rosemary is key and you can't go wrong with three different cheeses.

Untitled

1. Chicken Chorizo Patty Melts - I made 3lbs of fresh chorizo early in 2014 and had no idea what to make with it. SP did some searching online and found these patty melts. And the rest, as they say, is history. We fell hard for the wonderful flavors. When I found the last bag of chorizo in the freezer I actually shed a tear, knowing we wouldn't be able to enjoy another round of patty melts. I plan to make another batch of chorizo in the spring just so we can eat these again and again.

Best of 2014: Your Favorites

2014 was a tough year for us. Nothing catastrophic happened, it was just little things that piled one on top of another until we cried uncle. As we watched the ball drop on New Year's Eve, we both breathed a sigh of relief that 2014 was finally over and we could look forward to a fresh start in 2015. That's not to say we didn't have some good times in 2014. The highlight of the year was our first family trip to Disney World. And we tried to spend more time with family and friends, something we want to do more of in 2015.

As for this blog, I wasn't the best blogger in 2014. I'm hoping to change that this year. I want to focus on making new recipes and rediscover the joy of cooking.

So, while I didn't make a ton of new recipes in 2014, I figured it would still be fun to share your favorites and mine from the past year.

Here are your favorites from 2014. I'm not surprised to see any of these on the list. In fact, some even made my favorite list, which will post on Monday.

Peanut butter chocolate bars

14. Peanut Butter Chocolate Chip Bars. Peanut butter and chocolate are a perfect match so it was no surprise that these were just as amazing as they sound.

Crunchy baked tacos

13. Crunchy Baked Tacos. We have these tacos (or taco rice) at least every other week. It's simple to throw together and usually makes enough to put some leftovers into the freezer for another time.

Ham and Swiss sandwiches

12. Grilled Ham and Cheese Sandwiches with Caramelized Onions. This is a grilled cheese sandwich with the volume turned up. Melty, gooey perfection.

Untitled

11. Loaded Baked Potato Dip. I wish I had more reasons to make dips. I think I need to invite myself to more parties, or throw a few of my own.

Untitled

10. Corn Casserole. I do love it when a recipe calls for stirring a few ingredients together and baking.

Untitled

9. Artichoke and Brie Dip. I wish SP and Baby Girl like artichokes. Then I might stand a chance of making this delicious dip again.

Untitled

8. Broccoli Cheddar Risotto. I was on a serious risotto kick in 2014. Not surprised to see this one on the list. It makes a great side dish but if you add some protein like shrimp, chicken or even sausage it would become a one-pot meal.

Untitled

7. Bang Bang Cauliflower. Man alive was this recipe good. I need another excuse to make it. I'll be sure to invite some friends over, though, since I can't seem to find a small head of cauliflower.

Shrimp pasta with lemon cream sauce

6. Pasta with Shrimp in Lemon Cream Sauce. I used this sauce as the base for various pasta dishes throughout the year. We even had this on New Year's Day 2015. It's just that good.

Untitled

5. Chocolate Pudding. I love, love, love being able to make pudding from scratch. Rich and decadent, yet so easy to throw together. You just need to plan ahead so the pudding has time to cool.

Untitled

4. Breakfast Bowls. These bowls need to make another appearance on my dining room table ASAP. How could I have only made these one time?

Untitled

3. Avocado Enchiladas. Stuff some guacamole inside tortillas, smother with sauce and cheese, bake. What's not to love?

Untitled

2. Perfect Roast Chicken. I may have only gotten around to posting this recipe in 2014 but I've been making it for years. Like the name implies, this comes out perfectly every single time.

Untitled

1. Pasta alla Norcina. I admit, out of all the recipes I made in 2014 I was surprised to see this one at the top of your list. Don't get me wrong, it's a great pasta dish, but it just goes to show that you never know which recipes will grab your readers attention the most.

Recipe Redo: Polish Chicken

My grandmother has been making this recipe for Polish Chicken for as long as I can remember. It's the ultimate comfort food and one of those meals that instantly transports me back to my childhood.

Polish chicken

I went through a period where I didn't like meat on the bone (sacrilege) but thankfully I got over it. This is absolutely a meal you want to make with bone-in chicken. The bone helps the meat stay moist and tender. There's nothing complicated about this recipe, making it perfect for both a weeknight or a hearty, warming Sunday dinner. I think the gravy is my favorite part. As you can see in the photo, I smother everything on the plate with copious amounts. My grandmother always served Polish chicken with mashed potatoes and green beans so that's what I do, too.

And if you're wondering why this is called Polish chicken, I asked my grandmother and she said it's just what her mother called it when she was making it and the name stuck. Her family is Polish, so there you go. Regardless, it's delicious.

Polish Chicken
My grandmother's recipe

4 bone-in, skin-on chicken breasts*
1/4 cup flour
1 teaspoon garlic powder
1 teaspoon onion powder
salt and pepper
2 tablespoons vegetable oil
1 small onion, minced
2 cups water
1 cube chicken bouillon

Place the chicken in a resealable plastic food storage bag or in a baking dish. Add the flour, garlic and onion powder, and some salt and pepper. Seal the bag and toss to coat the chicken evenly in the flour (if using a baking dish, rub the flour and seasoning over the chicken to coat both sides).

Heat the oil in a large, deep skillet (make sure the skillet has a lid) over medium heat. Add the chicken, skin side down. Cook for 5 minutes, until the skin is brown and crispy. Flip and cook another 5 minutes. Add the minced onion around the chicken pieces and cook for about 5 minutes, until the onions begin to soften.

While the onion is cooking, bring the water to a boil (you can use an electric kettle, a pan on the stove, or heat it in the microwave). Add the bouillon cube and stir to dissolve. Once the onions are soft, add the water to the skillet. Bring to a boil, reduce the heat to medium-low, then cover. Cook for 25-30 minutes, stirring and turning the chicken every so often.

If the gravy looks a little thin, put a few tablespoons of flour in a bowl and add some water to make a paste. Whisk the paste into the gravy in the skillet. You should see the gravy thicken immediately. Taste the gravy and adjust the seasoning with salt and pepper, as needed.

Serve the chicken topped with the gravy.

*You can also use thighs or legs, just increase the amount based on how much you think your family will eat.

Penne with Five Cheeses

Another Sunday dinner prepared by SP. As I've mentioned before, he's loving Ina Garten right now. Her Penne with Five Cheeses sounded not only easy, but delicious. I've never seen a cream sauce like this before - you don't cook it ahead of time, just add the cooked pasta to the sauce and cheese and bake. I was skeptical but it worked.

Untitled

We all loved this but, unfortunately, it doesn't reheat well. I was so excited for the leftovers the next day, too. Oh well - that just means we get to eat it all next time. The only thing he changed was the cooking method. We don't own enough large ramekins to make individual servings, so we put the pasta and sauce in a large baking dish and baked it at 350 for about 20 minutes, until the sauce was bubbling.

Penne with Five Cheese
From Ina Garten

2 cups heavy cream
1 cup crushed tomatoes in thick tomato puree
1/2 cup freshly grated Pecorino Romano (1 1/2 ounces)
1/2 cup shredded Italian fontina (1 1/2 ounces)
1/4 cup crumbled Italian Gorgonzola (1 1/2 ounces)
2 tablespoons ricotta cheese
1/4 pound fresh mozzarella, sliced
6 fresh basil leaves, chopped
1 pound penne rigate pasta

Preheat the oven to 350 degrees.

Combine all the ingredients except the penne in a large mixing bowl. Mix well.

Cook the penne in boiling, salted water until al dente (1 or 2 minutes less than the recommended cooking time on the package). Drain well in a colander, then add to the ingredients in the mixing bowl, tossing to combine.

Add the pasta to a large baking dish (9x13 or larger). Bake for 20 minutes, until the sauce is bubbly and the edges are beginning to brown. Allow to cool for a few minutes before serving.

Note: due to the cream in the sauce, this doesn't reheat well.

"The Gobbler" {aka a Thanksgiving leftovers sandwich}

Despite living in New Jersey and Pennsylvania for most of my life, I've never eaten at a WaWa. Apparently I'm missing out. See, they sell this sandwich called The Gobbler and it's right up my alley. Turkey, stuffing, gravy and cranberry sauce on a hoagie roll. It's the ultimate in Thanksgiving leftovers, only you don't have to do any of the cooking.

Recently Coleen over at The Redhead Baker made an at-home version of The Gobbler sandwich. I was practically drooling all over my keyboard just reading about it so I knew I had to make it. The only problem was, we weren't going to be home for Thanksgiving. No problem - I just asked my mom to save me some turkey, stuffing and gravy. When we got home she dropped off the leftovers, I picked up some cranberry sauce and hoagie rolls and we were in business.

Untitled

As suspected, these were outstanding. I added a little mayo to our sandwiches because we all love mayo. Now I just need to get my hands on some more turkey or chicken, stuffing and gravy so I can make these again.

Thanksgiving Leftover Sandwiches (aka "The Gobbler")
As seen on The Redhead Baker

1 cup leftover turkey gravy
8 ounces leftover turkey, thinly sliced
4 hoagie rolls
mayo
jellied cranberry sauce
1 cup leftover stuffing

Warm the gravy in a medium saucepan over medium heat. When just starting to simmer, add the turkey meat. Heat just until the turkey is warmed through.

Split the rolls and toast them. Spread mayo on both side, then add cranberry sauce to each sandwich. Arrange some of the turkey meat and stuffing on each sandwich. Spoon more gravy over top. Serve warm.

Burgers with Brie, Caramelized Onions, Arugula and Garlic Mayo

I love a good burger, don't you? These Burgers with Brie, Caramelized Onions, Arugula and Garlic Mayo have been on my radar ever since Kate posted them. What's not to like about Brie and caramelized onions?

Untitled

Sorry for yet another bad sandwich photo but you get the gist. These were delicious. SP mistakenly bought the "intense, earthy" Brie rather than our usual "nutty and buttery" Brie, so the cheese really shone through. Between that and the peppery arugula, we were glad for the sweetness of the caramelized onions.

Burgers with Brie, Caramelized Onions, Arugula and Garlic Mayo
As seen on Kate's Recipe Box

1 lb. ground chuck
Salt and pepper, to taste
Brie cheese
caramelized onions
arugula
garlic mayo
4 burger buns

Heat a grill to medium heat.

Divide the meat into 4 patties. Press an indentation in the center so they don't bulge while they cook. Season both sides liberally with salt and pepper.

Grill for 3 minutes on one side, then flip and grill for another 2 minutes. Remove to a plate, top each patty with some of the cheese and tent with foil. Let rest for 5 minutes.

Serve the burgers on buns topped with caramelized onions, arugula and garlic mayo.

Pasta with Chicken Meatballs

Raise your hand if you miss natural light? ::raises hand:: My photos are nothing special in the spring and summer, but once I lose the natural light all bets are off. And it makes me so sad because I know people choose recipes in part because of the drool-inducing photos. So, my apologies, but you'll have to trust me that this was incredible.

On our flight home from California SP and I both watched cooking shows on the plane. During an episode of Giada's show she made Orecchiette with Mini Chicken Meatballs. It looked so delicious I knew I had to make it as soon as we got home.

Untitled

I made a few modifications, subbing campagnelle for the orecchiette since I had a box in the pantry. Really, any small shape will do. I also used diced tomatoes because I'm weird and don't like loose tomato skin. Because I used canned tomatoes, I measured out the liquid in the can and then topped it off with chicken broth.

This was truly outstanding, with light, tender meatballs and a delicious sauce made even better by the addition of fresh, melty, gooey mozzarella cheese. The recipe made enough food to feed an army, which was good because we were all fighting over the leftovers.

Pasta with Chicken Meatballs
Slightly adapted from Giada De Laurentiis

1 pound small cut pasta, such as orecchiette, campagnelle, penne, etc.
1/4 cup dry bread crumbs
1/4 cup chopped fresh flat-leaf parsley
2 large eggs, lightly beaten
1 tablespoon milk
1 tablespoon ketchup
3/4 cup grated Pecorino Romano cheese
3/4 teaspoon salt
3/4 teaspoon freshly ground black pepper
1 pound ground chicken
1/4 cup olive oil
chicken stock (amount will vary, see directions)
1 28-oz can diced tomatoes, juice reserved
1/2 cup freshly grated Parmesan or more Pecorino
8 ounces fresh mozzarella, cut into small pieces
1/2 cup chopped fresh basil leaves

Bring a large pot of salted water to a boil over high heat. Add the pasta and cook according to package directions. Drain the pasta, reserving about 1 cup of the pasta water. Set aside.

In a medium bowl, stir together the bread crumbs, parsley, eggs, milk, ketchup, cheese, and the salt and pepper. Add the chicken and gently stir to combine. With wet hands (this is key, otherwise the chicken will just stick to you rather than form into meatballs), roll the chicken into mini meatballs. Make them as big or as small as you want. You'll need to wet your hands often so keep a bowl of water nearby.

In a large skillet, heat the oil over medium-high heat. Add the meatballs and cook without moving until brown on the bottom, about 2 minutes. Turn the meatballs over and brown the other side, about 2 minutes longer.

Add the juice from the tomatoes to a large measuring cup. Add enough chicken stock to make 1 1/2 cups total. Add the chicken stock, tomato juice and tomatoes to the skillet. Bring to a boil. Using a wooden spoon, scrape up the brown bits from the bottom of the pan. Reduce the heat to low and simmer until the meatballs are cooked through, about 5 minutes.

Add the pasta to the skillet. Add the Parmesan and toss, adding reserved pasta water, if needed, to loosen the pasta. Add the mozzarella cheese and chopped basil. Gently toss to combine. Serve immediately.

Chinese Green Beans with Pork

I think of my friend MaryEllen as the queen of stir fries. Pretty much any Asian stir fry on this blog came from her. This recipe for Chinese Green Beans with Pork is based on her recipe, but modified a bit based on what I had in my pantry and fridge.


This was a great way to use up 2 lone pork chops I found in the freezer. Green beans have been hit or miss for us this year but this was a good batch. Simple, tasty, and quick - my idea of a great weeknight dinner.


Chinese Green Beans with Pork
Modified from Mary Ellen’s Cooking Creations

1 tablespoon sesame oil
2 pork chops cut into very small pieces
1 lb washed and trimmed green beans
2 cloves garlic, minced
1 1/2 cups chicken stock
2 tablespoons cornstarch
2 tablespoons oyster or hoisin sauce
2 tablespoons soy sauce
1 heaping teaspoon chili garlic sauce
Freshly ground black pepper
1-inch piece fresh ginger, peeled and grated
2 tablespoons Shaohsing rice wine
1 small bunch scallions, sliced thin
white rice or spaghetti/angel hair, cooked, for serving

Heat a large skillet over high heat. Add the sesame oil then add the pork and sauté for 3-5 minutes until the meat is mostly cooked. Add the green beans and garlic and sauté 1 minute. Combine the stock, cornstarch, oyster or hoisin sauce, soy sauce, chili garlic sauce, pepper and grated ginger, then add to the skillet. Bring to a boil. Continue cooking over high heat for 7-9 minutes longer, stirring frequently, until beans are slightly tender but still have some crispiness to them.

Stir in the scallions and rice vinegar, and cook one minute longer. Serve over cooked rice or noodles.

Indonesian Ginger Chicken

I've mentioned before that SP has taken over cooking Sunday dinner. He's been on an Ina Garten kick lately and was very excited to make her Indonesian Ginger Chicken.


This was some seriously awesome chicken. Incredibly flavorful from the marinade and really easy to cook. He used two cut-up chickens from the grocery store and we noticed that the white meat wasn't nearly as flavorful as the dark meat. You could really taste the marinade in the dark meat pieces. As much as I love white meat, I think this would be best with legs and thighs rather than whole chickens.

Untitled

He served the chicken with herb basmati rice and roasted carrots. At my recommendation, he boiled the marinade to thicken it into a gravy to serve over the chicken. That was a big hit as well.

Indonesian Ginger Chicken
From Ina Garten

1 cup honey
3/4 cup soy sauce
1/4 cup minced garlic (8 to 12 cloves)
1/2 cup peeled and grated fresh ginger
6lbs total bone-in chicken legs and thighs

Cook the honey, soy sauce, garlic, and ginger in a small saucepan over low heat until the honey is melted. Arrange the chicken pieces in 1 layer in a shallow baking pan, skin side down. Pour on the sauce. Cover the pan tightly with aluminum foil. Marinate overnight in the refrigerator.

Preheat the oven to 350 degrees.

Place the baking pan, still covered with the foil, in the oven and bake for 30 minutes. Remove the foil, turn the chicken pieces skin side up, and raise the temperature to 375 degrees. Continue baking for 30 minutes or until the juices run clear when you cut between a leg and thigh and the sauce is a rich, dark brown.

If you want, remove the chicken pieces to a serving platter and cover with foil. Strain the sauce from the baking dish through a sieve and add to a small pot. Boil the sauce until it thickens slightly. Serve as gravy to spoon over the chicken.